
**this post contains gifted items, discount code at the end of the post**
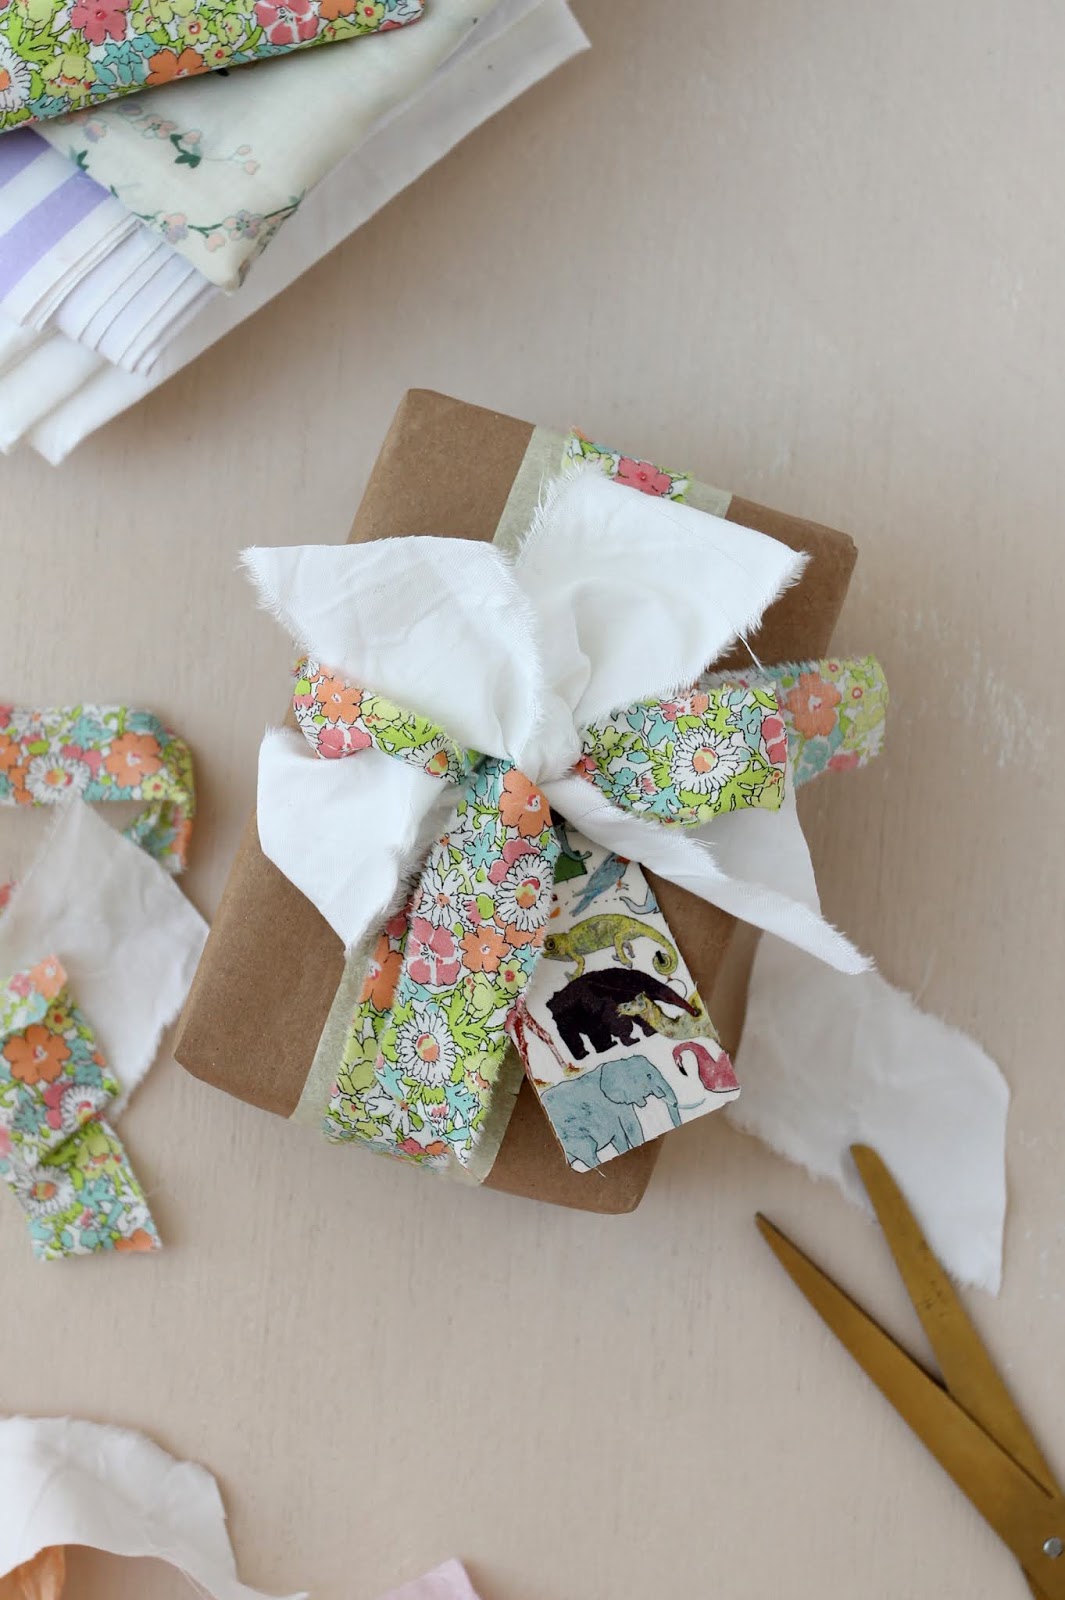
You know spring has sprung when the urge to lavish anything with Liberty prints surfaces. As I wrote in my last post, we were having a particularly bad week when these gorgeous Liberty gift tags and letters arrived from Laura Made It. They were just the pick-me-up I needed to kick start a new gift wrapping post for you all. Beautifully handmade by Laura in Lincolnshire, I love how they are designed to be keepsakes and I know that I’ll be using mine on Stanley and Milly’s presents for many years to come.
I love the optimism and abundance that comes with Spring and really wanted to go to town with prints, patterns and textures on these presents but also inspire you to use materials you might already have at home. I started with a classic brown paper and layered up odd pieces of tissue paper and fabric in my stash – for this tutorial more is definitely more and in these difficult times creating moments of lightness and joy is SO important. Here’s how to make…

You’ll need
Wrapping paper (I used brown paper but use what you have), Wooden gift tags – I used a personalised letter tag and wooden gift tags, tissue paper or contrasting paper scraps and a selection of printed and plain fabrics, tape (double sided or regular)

Step 1
Wrap your present in your base paper – use my post The Basics of Gift Wrapping as a guide to get you started and run a band of contrasting tissue around the centre fixing at the back with tape. As a rough guide the tissue strip was about half the width of the present. Cut or tear a strip of fabric for the bow, mine was about half the width of the tissue wrap – you’ll need enough to wrap around the present and tie a bow. Wrap around the present and tie in a single knot. Cut or tear a second contrast piece of fabric about the same width as the tissue wrap and long enough to be tied in a bow. Place under the first fabric. Take your gift tag and tie around the knot. I promise its easier than it sounds!!!
Step 2
Take both lengths of fabric and tie in a bow (my guide on How to Tie a Bow) will help. Puff out the ‘ears’ and ends and trim off any excess fabric.


Once you get going with these the possibilities are endless, I love how Liberty, vintage and modern fabrics look so good together complimenting the sweet gift tags. A huge thanks to Laura for kindly gifting these to me and also offering Lotts and Lots readers 20% off with the code CHARLOTTE20. Tags – Laura Made It, DIY, styling and photography all me. If you’d like to work with me please get in touch for rates, I’d love to hear from you. Happy Wrapping! xx


Comments
Did you enjoy reading my post? Please do leave a comment and let me know what you think, I love to hear from you.
Wow, amazing blog layout! How lengthy have you been running a
blog for? you made blogging glance easy. The entire look of your site is wonderful, let alone the content material!
You can see similar here najlepszy sklep
Wow, superb weblog structure! How long have you ever been blogging for?
you made blogging look easy. The total glance of your web site is excellent, let alone the
content material! You can see similar here dobry sklep
Heya i am for the primary time here. I found this board and I in finding It really helpful & it
helped me out much. I’m hoping to offer something again and help others like
you helped me. I saw similar here: Dobry sklep
Hi! Do you know if they make any plugins to assist with SEO?
I’m trying to get my blog to rank for some targeted keywords but I’m
not seeing very good success. If you know of any please share.
Thank you! You can read similar article here: Najlepszy sklep
Hi there! Do you know if they make any plugins to assist with SEO?
I’m trying to get my site to rank for some targeted keywords but I’m not seeing
very good results. If you know of any please share. Appreciate
it! You can read similar art here: List of Backlinks
Wow, superb weblog format! How lengthy have you ever been blogging for?
you make blogging look easy. The full look of
your site is wonderful, let alone the content material!
You can see similar here sklep internetowy
Wow, awesome blog format!
How long have you been running a blog for? you make running a blog glance
easy. The overall glance of your site is fantastic, let alone the content!
You can read similar here prev next and it’s was wrote
by Hulda76.
Also visit my web page Damian84
Wow, marvelous blog layout!
How lengthy have you ever been running a blog for?
you make blogging glance easy. The total look of your website is excellent, as well as the content material!
You can read similar here prev next and that was wrote by Marcellus69.
Here is my web site … Brigitte03
Hey there! Do you know if they make any plugins to assist with Search Engine Optimization? I’m
trying to get my site to rank for some targeted keywords but I’m
not seeing very good gains. If you know of any please share.
Kudos! I saw similar text here: Where to escape room
There’s definately a great deal to know about this issue.
I like all the points you have made.
seo services india – seohawk
Here is my webpage :: seo company india – seohawk
Wonderful post but I was wanting to know if you could write
a litte more on this subject? I’d be very thankful if
you could elaborate a little bit more. Many thanks!
https://www.pi-news.net/author/seohawk/
click here – https://www.dualmonitorbackgrounds.com/seohawk
My web page – Herman
Hey there! Do you know if they make any plugins to assist with SEO?
I’m trying to get my site to rank for some targeted keywords but I’m
not seeing very good gains. If you know of any please share.
Thanks! You can read similar article here: blogexpander.com
Write more, thats all I have to say. Literally, it seems as though you relied
on the video to make your point. You definitely know what youre talking about, why
throw away your intelligence on just posting videos to your site when you could be giving us something informative to read?
My web-site – affordable local affordable seo services
Its like you read my thoughts! You seem to understand a lot approximately
this, such as you wrote the e book in it or something.
I feel that you can do with a few percent to drive the message house a
bit, however other than that, this is magnificent blog.
A fantastic read. I will certainly be back.
Also visit my webpage :: web site